Introduction:
Managing shared components, design systems, and business logic is one of the most challenging tasks teams face when developing multiple Flutter applications. Most of the time, this leads to significant code duplication across different repositories. While it might seem manageable at first, over time it creates unnecessary complexity, slows down development, and makes maintenance far more difficult than it needs to be.
That’s where the concept of a Flutter Monorepo comes in. Instead of managing several separate repositories, a monorepo allows you to keep all your related projects and shared code in one single place. This approach not only helps avoid duplication but also ensures consistency, easier collaboration, and faster updates across projects.
At Payoda, we frequently work on multiple Flutter applications that rely on common modules and design patterns. In this guide, we’ll walk you through how to set up a Flutter monorepo using Melos Monorepo Setup and VS Code workspace files to make your development workflow smoother and more efficient.
So, What’s a Monorepo? And Why Should You Care for Flutter?
A monorepo (short for monolithic repository), is a way of organizing your code where all projects live in a single repository, even if they serve different purposes. For Flutter development, this setup allows you to manage multiple apps and packages together in one place, making collaboration and maintenance much easier.
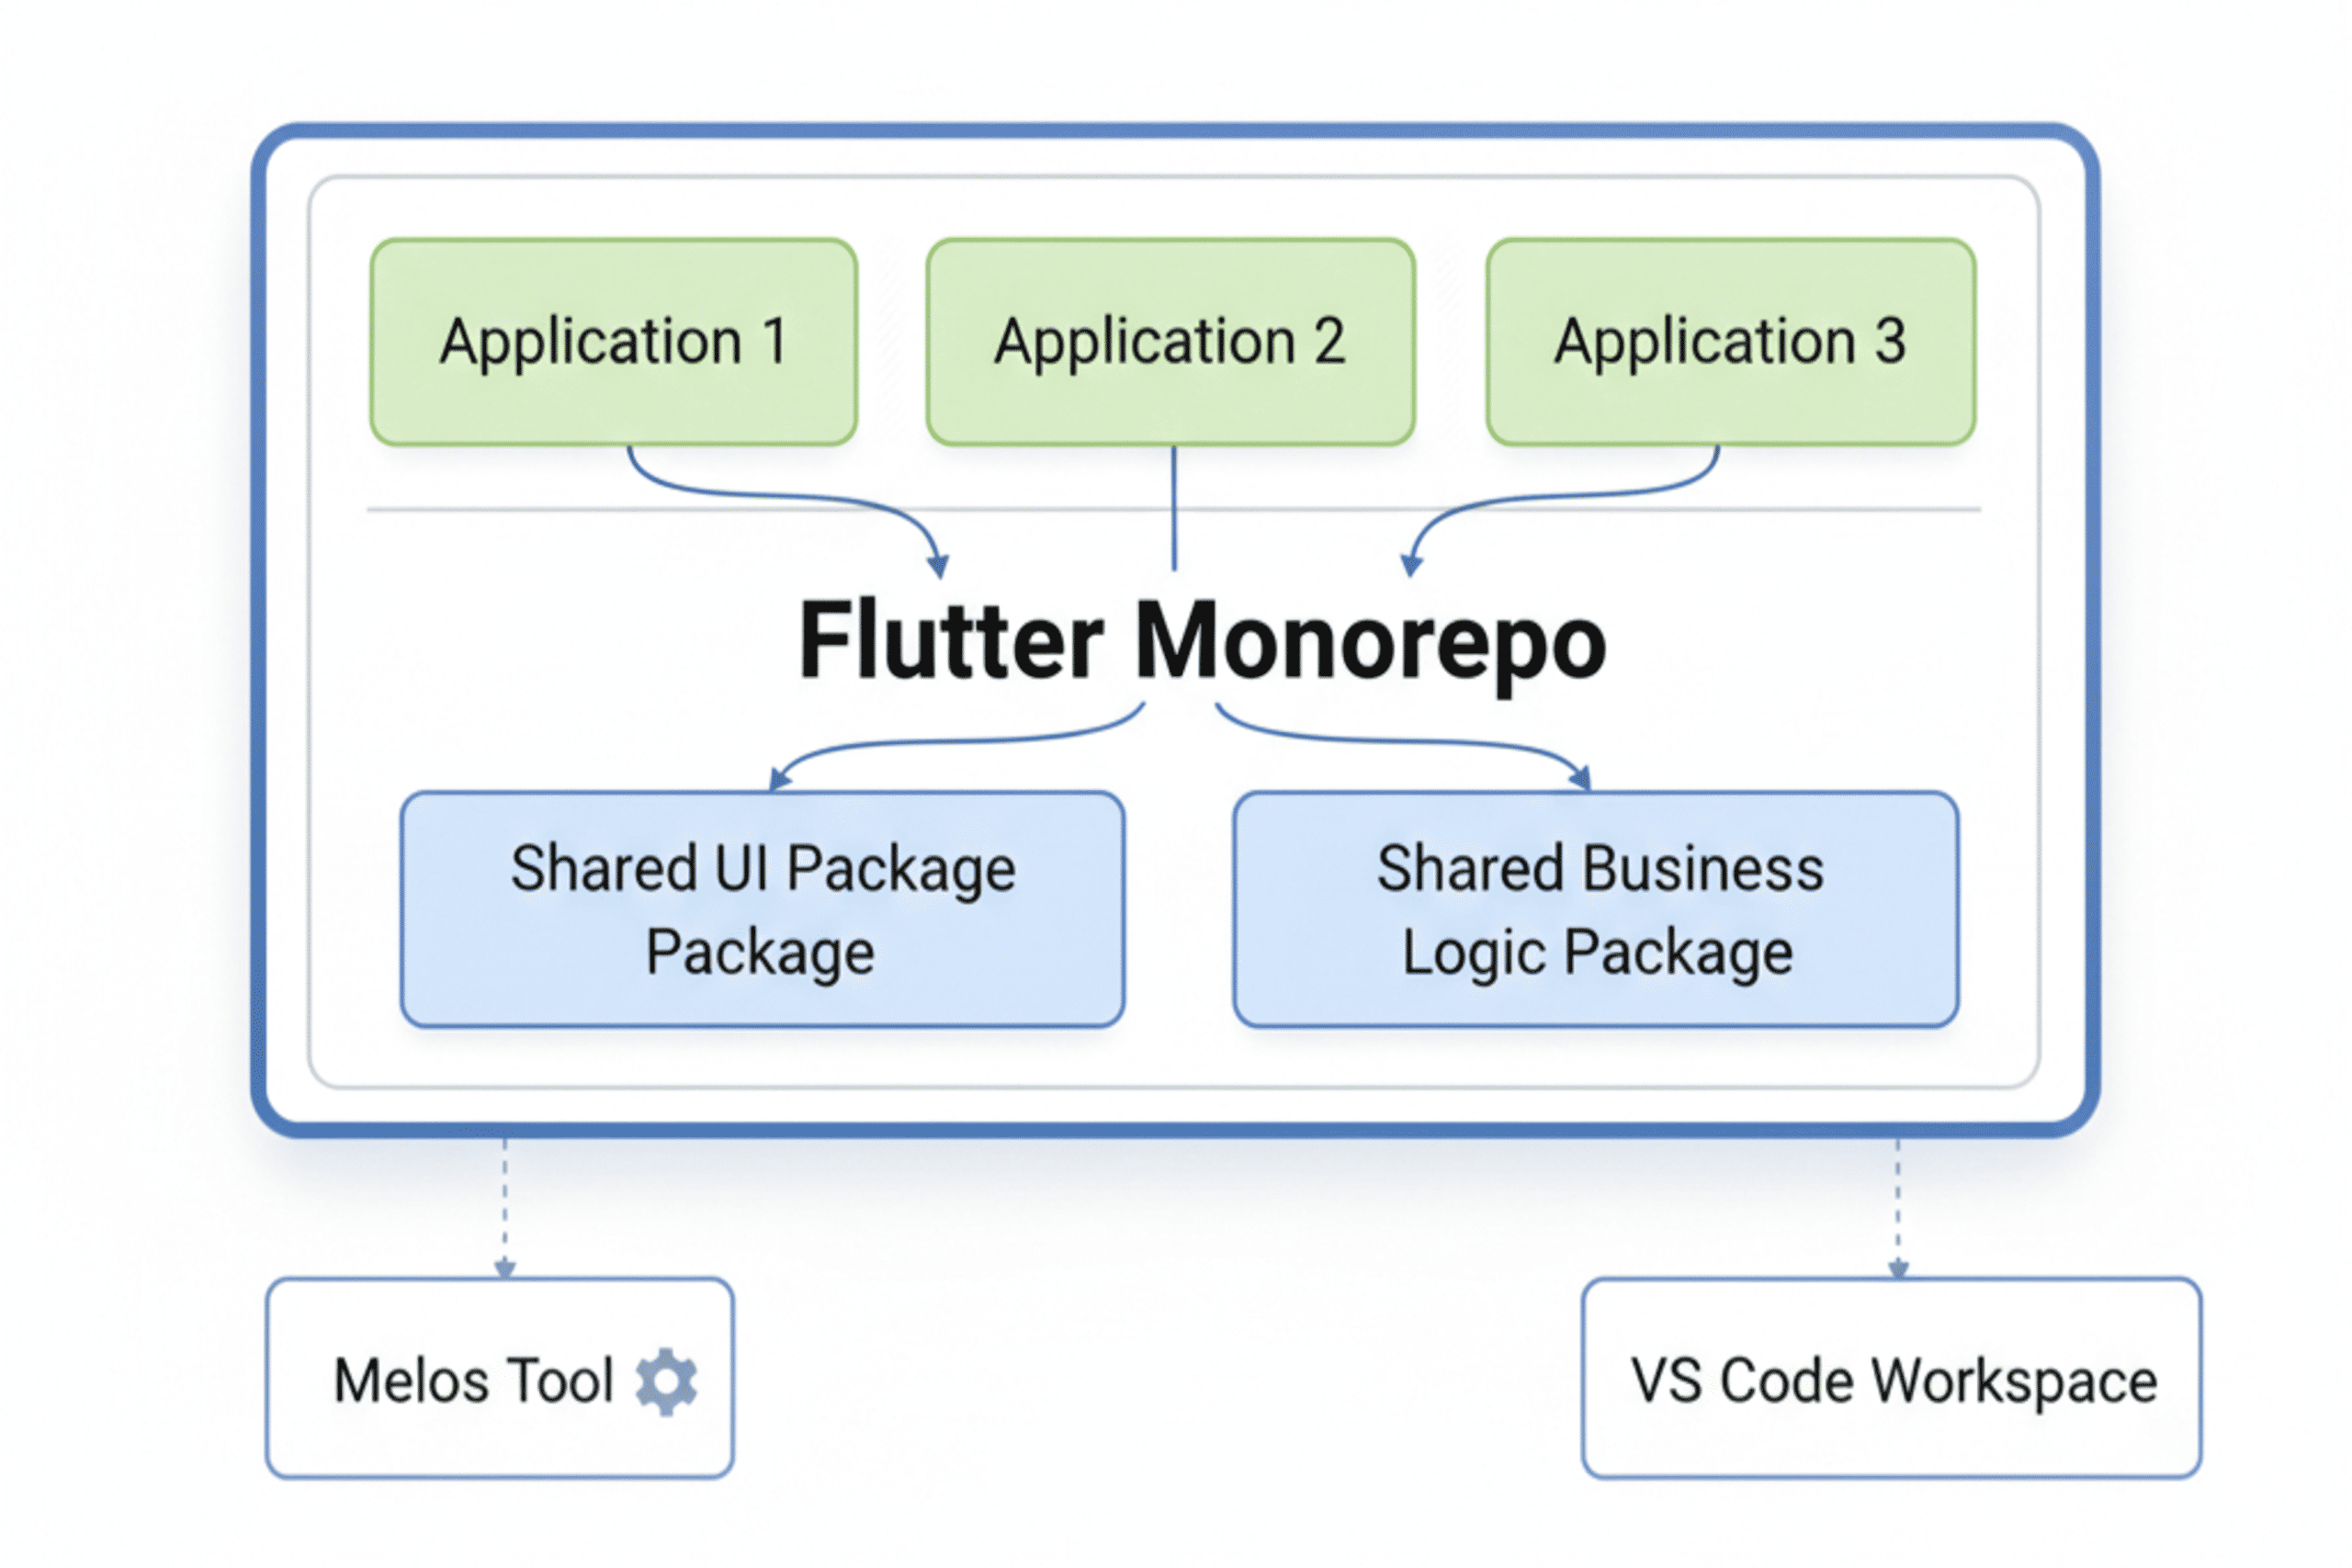
Benefits for Flutter:
- Code Reusability: You can reuse Flutter widgets, utility functions, business logic, and even complete UI components across multiple applications without doing copy and paste all the time.
- Simplified Dependency Management: You can manage all your project dependencies from one place, keeping everything consistent and minimizing version conflicts.
- Atomic Changes: Make changes across multiple projects in a single commit, making testing and deployment much simpler.
- Consistent Tooling: Ensure all developers work with the same versions of tools, linters, and build configurations for a consistent development experience.
- Easier Refactoring: Refactor shared code with confidence, knowing that all dependent projects were written in the same repository.
Tools for Your Monorepo setup
While you can manually set up a monorepo, using specialized tools makes the process much easier. We’ll focus on:
- Melos: A powerful Dart package that provides a better way to manage multiple Dart/Flutter packages within a monorepo. It helps with linking packages, running scripts, and even publishing.
- VS Code Workspaces: A feature in Visual Studio Code that allows you to define a workspace encompassing multiple project folders, making navigation and development within a monorepo seamless.
Step-by-Step Monorepo Setup
Let’s dive into setting up your Flutter monorepo.
1. Initialize Your Monorepo Root
First, create an empty directory for your monorepo and navigate into it.
mkdir flutter_monorepo
cd flutter_monorepo
2. Install Melos Globally
If you don’t have Melos installed, do so now.
dart pub global activate melos
3. Initialize Melos in Your Monorepo
Run the Melos initialization command. This will create a melos.yaml file, which is the configuration file for your Melos monorepo Setup.
melos init
Your melos.yaml will look something like this:
name: flutter_monorepo
packages:
– apps/**
– packages/**
We add apps/** as well to ensure Melos recognizes our application folders.
4. Create Your First Flutter Project (an App)
Now, let’s create a simple Flutter application within your Flutter monorepo. It’s good practice to place your applications in a designated apps folder.
mkdir apps
cd apps
flutter create my_first_app
cd ..
Your directory structure will now look like this:
/
├── apps/
│ └── my_first_app/
│ ├── android/
│ ├── ios/
│ ├── lib/
│ └── pubspec.yaml
│
├── melos.yaml
└── .gitignore
Directory structure showing the ‘apps’ folder with ‘my_first_app’ inside it.
5. Create a Shared Flutter Package
The real power of a Flutter monorepo comes from sharing code. Let’s create a shared package that our app can use. It’s common to place these in a packages folder.
mkdir packages
cd packages
flutter create –template=package shared_ui_components
cd ..
Your structure now includes a shared package:
/
├── apps/
│ └── my_first_app/
│ ├── …
│
├── packages/
│ └── shared_ui_components/
│ ├── lib/
│ └── pubspec.yaml
│
├── melos.yaml
└── .gitignore
Directory structure now showing both the ‘apps’ and ‘packages’ folders.
6. Link Packages with Melos
Now that you have an app and a shared package, you need to tell your app to use the shared package. Melos Monorepo Setup handles the local linking for you.
Open apps/my_first_app/pubspec.yaml and add your shared package as a dependency:
# apps/my_first_app/pubspec.yaml
dependencies:
flutter:
sdk: flutter
shared_ui_components:
path: ../../packages/shared_ui_components
Then, run melos bootstrap from the root of your Flutter monorepo. This command ensures all packages are linked correctly and their dependencies are fetched.
melos bootstrap or melos bs
This command will:
Find all packages defined in melos.yaml.
Run flutter pub get or dart pub get for each package.
Symlink local dependencies (like shared_ui_components into my_first_app).
7. Using the Shared Package
Let’s add a simple widget to our shared_ui_components package.
Open packages/shared_ui_components/lib/shared_ui_components.dart and modify it:
// packages/shared_ui_components/lib/shared_ui_components.dart
library shared_ui_components;
import ‘package:flutter/material.dart’;
class MySharedButton extends StatelessWidget {
final String text;
final VoidCallback onPressed;
const MySharedButton({Key? key, required this.text, required this.onPressed}) : super(key: key);
@override
Widget build(BuildContext context) {
return ElevatedButton(
onPressed: onPressed,
child: Text(text),
);
}
}
Now, in your my_first_app, you can import and use this widget. Open apps/my_first_app/lib/main.dart and modify it to include the button. Run flutter run from apps/my_first_app to see your shared component in action.
A sample mobile UI showing the app using the shared button component.
Enhancing Your Workflow with VS Code Workspaces
Working with multiple projects in a single VS Code window can be messy. A .code-workspace file helps VS Code understand your Flutter monorepo structure.
1. Create a Workspace File
In the root of your flutter_monorepo directory, create a file named flutter_monorepo.code-workspace.
// flutter_monorepo.code-workspace
{
“folders”: [
{
“name”: “App: my_first_app”,
“path”: “apps/my_first_app”
},
{
“name”: “Package: shared_ui”,
“path”: “packages/shared_ui_components”
}
],
“settings”: {
“dart.runPubGetOnActivation”: true
}
}
2. Open the Workspace
Open VS Code and go to File > Open Workspace from File… and select your .code-workspace file. Now, your VS Code sidebar will be neatly organized, allowing for easy navigation.
The VS Code sidebar with the ‘my_first_app’ and ‘shared_ui’ folders clearly separated in the workspace view.
Advanced Melos Usage
Melos offers many more features to manage your Flutter monorepo effectively.
- Running Scripts: Define custom scripts in melos.yaml to automate tasks like testing or analysis across all packages.
# melos.yaml
scripts:
analyze:
run: melos exec — flutter analyze
description: Runs flutter analyze on all packages.
test:
run: melos exec — flutter test
description: Runs flutter test on all packages.
You can then run these with melos run analyze.
- Filtering Packages: Use –scope flags with melos commands to target specific packages.
melos exec –scope=”my_first_app” — flutter build apk
Conclusion
At Payoda, we’ve found that using a Flutter monorepo with tools like Melos Monorepo Setup and VS Code workspaces is a game-changer for managing projects that involve multiple apps or packages. By centralizing your code, this setup makes it much easier to share widgets, utility functions, and business logic across projects without repeating yourself.
With a monorepo, dependency management becomes far simpler, as all packages can be updated and tracked consistently from a single place. Additionally, it enables developers to make changes to several projects in a single commit, which facilitates and reduces the likelihood of errors during testing and deployment. By ensuring that all team members use the same versions of Dart, Flutter, linters, and build configurations, consistent tooling helps to minimize conflicts and headaches.
In general, using a Flutter monorepo approach promotes a development environment that is more maintainable, scalable, and collaborative. It’s a technique that can greatly increase output and code quality for Flutter teams working on challenging or expanding projects.
FAQs
- When should I not use a monorepo?
A Flutter monorepo is ideal for projects that are closely related and share a significant amount of code. If your projects are completely unrelated, have different tech stacks, or need to be deployed and versioned independently, sticking with separate repositories might be a simpler and more effective approach.
- Can I add an existing Flutter project to a Melos monorepo?
Yes! You can move your existing project's folder into the apps or packages directory of your monorepo. After adding its path to melos.yaml, you'll need to update its pubspec.yaml to point to any local shared packages using path: dependencies. Finally, run melos bootstrap to link everything together.
Talk to our solutions expert today.
Our digital world changes every day, every minute, and every second - stay updated.